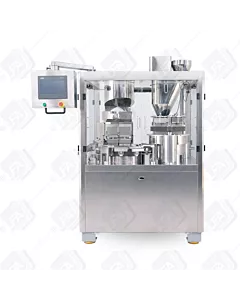
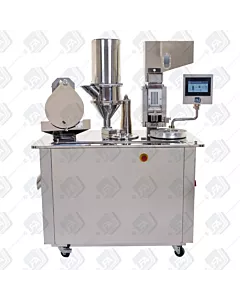
FACF Capsule Filler Tooling Change
Hello and welcome to LFA’s video on changing the tooling on an FACF fully automatic capsule filling machine.
The FACF is able to use all size and types of empty capsules. Tooling changes happen in 3 parts. For a tooling tooling change we will need:
- A 19mm spanner
- A 17mm spanner
- A 10mm spanner
- A 5mm allen key
When tightening the bolts and fittings on the machine we always suggest reading the manual for the recommended tensions.
Main Turret
First we need to remove the capsule closing plate, undo the 2 bolts on top and remove. There will also be a small metal plate, remove this and place it to one side.
Next we’re going to remove the top section of the tooling, take your spanner and remove the 2 bolts shown here.
Now take a 5mm allen key and place it into the bolt behind the bottom section of the tooling and undo, this will release the bottom section.
Rotate the machine so your next station is in position and repeat the process.
When placing your new tooling into place, you need to line up the 2 holes on the tooling with the pins on the turret, once in place take your 5mm allen key and tighten. Ensure it’s tight.
Take your top section of new tooling, ensure the chamfer is facing upwards, place it under the lip of the turret. Place the bolt and nut through the top and tighten finger tight, do the same with the other bolt and again tighten finger tight, this is very important. It ensures you’re still able to adjust it.
Rotate the turret till its in the next station, take your 2 alignment tools and place them into the end slots of the tooling to line up both the top and bottom sections of tooling. It’s important they are placed in the end slots to ensure correct alignment.
Then we’re able to tighten the top section of the tooling, do this evenly and in small increments. Whilst doing this check the alignment tools, they should always be able to drop and spin freely in the slots. Keep doing this till the bolts are tight.
When all stations have been changed we can replace our capsule closing plate. When replacing the capsule closing plate we must first place the small metal plate back into place.
The capsule closing plate is chamfered along one edge, this edge needs to be over the tooling as seen here. Place the bolts back into place and tighten first fingers tight and then tighten equally with a spanner.
Capsule Sewing Section
Next we need to change the tooling in the capsule sewing section to match up with your new tooling on the main turret.
First close the door in the hopper to prevent any further capsule from falling into the sewing section.
Next we first need to remove the hopper from the top. Remove the 2 bolts at either side with a 5mm allen key.
Once removed, lift the hopper upwards and very carefully as not to damage the leading edge of this section as they’re very fragile. Now we’re going to remove the front section of the capsule sewer by removing the 4 allen key bolts using a 4mm allen key. As removing this ensures you take the weight of the front section as it will fall.
Remove the 2 bolts either side of the teeth section of the capsule sewer, this will allow you to remove it. Place it to one side.
We’re going to be removing the button which turns the capsules on and off, we suggest marking around the bolts to record their position. The position of this piece is very important to make sure the capsules drop on time.
Once this has been done you can remove the 2 bolts with your 5mm allen key. This will release the whole piece.
Now we’re going to remove the panels of the sewer to allow you more access to the bolts inside. There’s 4 screws on both sides of the unit, remove these and the panels will slide off in one piece.
Now we can remove the 2 bolts which will release the back teeth and allow you to remove them.
Place your new “back teeth” into place, replace the bolts and tighten the bolts but leave them loose so we’re able to adjust them.
Slot the “front teeth” back in and replace the 2 front bolts, again don’t tighten all the way up so we’re able to tune them.
So next we slot our calibration tools in the end slots ensuring the thicker end is slotted into the holes and make sure there’s very little play. We can now fully tighten the front 2 bolts, turn the front 2 bolts in equal increments and checking whilst we do this.
Next manually move the turret so the “back teeth” move to the furthest point forward in their cycle just before they start moving back again.
Next we take 2 empty capsules and place them in the end slots making sure the line of the capsule is in line with the “front teeth”. Also make sure the 2 separate teeth sets are not touching and are equally spaced front each other.
Now start to tighten the 2 bolts on top of the back teeth, do this equally, in small increments whilst checking the 2 caps making sure they’re still aligned whilst doing this.
Again turn the machine turret by hand and listen for squeaking or rubbing sounds Replace the front section of the capsule sewer by lining it up and replacing the 4 bolts with your allen key, like our other pieces we’re not going to fully tighten this section just yet.
Next rotate the machine so the front section drops down into its lowest position.
Next look at the gaps along the front to ensure they are equally spaced out and are not rubbing or pushing to one side. Line it up and fully tighten the bolts equally and in small increments.
Once done, rotate the machine by hand whilst watching the rotation to ensure there’s no rubbing or noises.
Now replace the side panels of the capsule sewer and replace the bolts.
Before we replace the capsule release pin we need to add some capsules to the capsule sewer, take your capsules and manually load them into the top, ensure it’s fairly full. Now manually turn the FACF by hand to ensure the capsule sewer is at its highest point, now reinstall the capsule release pin using the guidelines which you marked on to it earlier. Simply line up the lines with your bolts and tighten equally. One tightened press your capsule release pin in.
When replacing the hopper we need to be very careful as not to damage the front section when placing it over the top. Gently lower it ensuring its central and not rubbing at either side. Then replace the 2 bolts at either side and again tighten evenly.
Test again by turning the manual handle and look and listen for any rubbing or squeaking.
Finally open the door on the hopper to allow the capsules to flow through the machine again.
Tamping Turret
Now we need to change the capsule filling machinery tooling in the tamping turret.
First loosen the bolt on the side of the top section pillar, this will allow you to raise the top part of the machine and you to remove the hopper. Once raised re-tighten the bolt.
Next undo the 3 bolts on the underside of the top section which will allow you to remove the hopper, we suggest 2 people to do this to ensure the hopper does not fall.
We now need to remove the auger paddle so we’re able to remove the hopper. To access the bolt to remove this we need to remove the sides around the top section. Remove the 2 bolts at either side and then the top section should pull away.
At the top of the auger paddle there’s a bolt, undo this and take the weight of the auger filler. Remove it and place it to one side.
Then rotate the top section so it’s out of the way, you’re then able to lift the hopper out of the machine, we suggest 2 people to do this.
The next task we're doing is removing the sensor, follow the cable down the center of the tamping turret and pull out the sensor and place it to one side.
The next important step is to number the stations, this is to assist us when we’re replacing our tooling.
Take your spanner and remove the nuts and washers around the top section of the tamping turret.
Next we’re able to remove the tamping tooling, this can be done in any order, be very careful with the tips of the tamping tooling as they’re fragile. Lay them down gently as to not damage them.
Remove the middle casing and the outer casing and place them to one side.
Next we’re removing this section, on top is a 19mm bolt, take a spanner and remove it. Next lift the block up and out, be very careful with the brass spacer as this is extremely important and set to an exact tolerance.
Remove the 2 19mm bolts at either side, you’ll then be able to remove the whole middle section of the tamping turret.
The next section down is secure with 4 bolts that are 10mm, take your spanner and remove these. Lift this out and place it to one side.
The bottom section of the tamping turret requires a special tool that comes with the FACF. Take this and remove the 3 14mm bolts. You’re then able to lift and remove this section.
Whilst you’re in the section of the machine we suggest cleaning the inside out. Whilst the FACF does have a paddle out that pushes out the reject powder, if your powder is fine it may stick around the edges.
Also it’s advisable to check the wear around the brass ring, we’d suggest doing this for every 1 milling to 2 million capsules especially if your powder is very coarse.
Now we start building the tamping turret back up. Start with the bottom section of the tamping turret and re-insert the 3 bolts and tighten but leave room so there’s still play and we can still adjust it.
When replacing the next plate we need to ensure the sensor holder is in an outward facing position. Re-insert the 14mm bolts, these can be fully tightened but go around and tighten them equally in small increments.
Next replace the middle section. Make sure this hole is facing the main turret of the machine in position 6.
Now replace the 2 19mm bolts at either side of the middle section, these again can be fully tightened.
Now we rotate the machine by hand so the tamping turret is at its lowest point in the cycle.
Now take your alignment tools, place the alignment tools at either end of the station, now adjust the bottom section until the alignment tools fall into place. Ensure that the alignment tools are loose and able to move freely.
Now use the special tool that came with your FACF and tighten the bottom section, as always, do this in small increments and equally. Check the alignment tools periodically whilst doing this to ensure they’re still moving freely.
If you find the alignment tools are catching and rubbing, simply loosen the bolts at the bottom section, adjust and redo.
Now we’re replacing the block with our first tamping tool, whilst doing this we need to place our brass ring into position. Replace the 19mm bolt into the block and through the brass ring then tighten fully.
Now replace the middle casing which will just sit in the groove in the middle of the machine.
You’re then able to remove the outer casing, the section of the casing without a window needs to be in station 6 or facing towards the middle of the main turret. The other windows need to be facing stations through 1-5.
Now we’re replacing the tamping tools into the positions they were originally removed from. Whilst doing this we need to ensure we’re being careful with the tips of the tamping tools as they’re fragile.
Now we need to replace the washers and nuts on the very top section to secure the tamping tools into place.
Now we need to tighten the 17mm nuts on top, these need to be tightened equally in small increments.
Next the sensor is placed back through the middle into the slot that was shown earlier.
The hopper is lowered gently over the top down through the center section, keep the auger filler paddle inside the hopper.
Now move the auger filler motor back over the top of the hopper, lift the auger filler paddle out of the hopper and into position. Tighten the bolt at the top of the auger filler paddle.
Raise the hopper into position and tighten the bolts to hold it into place.
Replace the cover of the auger filler motor and replace the bolts at either side.
Now we lower the auger filler motor and hopper back down into position. Partially undo the bolt on the auger filler pillar and gently lower supporting the weight. Once in position, re-tighten the bolt.
This is all of the steps included in changing the tooling on the FACF fully automatic encapsulation machine.
The next step would be tuning the weight of your capsules which we cover in this video.